Category: Barbecue

Barbecued foods

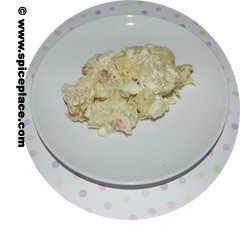
A Simple Homemade Potato Salad

Potato Salad RecipeWe enjoy having potato salad along with our summer barbecued foods like hamburgers, and chicken. Somehow the taste of potato salad blends with the barbecued foods. Occasionally we have found some prepared potato salad with a nice taste. But that’s hard to find as storage, preservatives, and mass production all are detrimental to the flavor.

So we prefer, most of the time, to make our own potato salad. We know it’s fresh, limit the amount of salt we add, and enjoy knowing the potato salad was a result of our own efforts. We’ve never entered this recipe in a contest, but all of our friends rave over it when we serve the recipe at holiday weekend barbecues.

Easy Potato Salad Recipe

  • 2 pounds of red skinned potatoes
  • 2 eggs
  • 3/4 cup light mayonnaise
  • 2 tbsp dried cilantro
  • 1/8 tsp white pepper
  • 2 tbsp lemon juice

To make Easy Potato Salad

  1. Fill a large pot with water, and bring to a boil.
  2. Add the red skinned potatoes.
  3. Cook for 12 minutes, then add the 2 eggs in shell to make hard-boiled eggs.
  4. Cook for another 12 minutes. Drain, cool, then refrigerate the potatoes and eggs for 3 hours.
  5. Peel the potatoes if desired. Cut the potatoes into 1/2″ chunks and place in a large bowl.
  6. Peel the hard-boiled eggs, cut into 1/4″ slices, and then crumble the eggs over top of the potatoes.
  7. Combine the mayonnaise, cilantro, lemon juice, and white pepper in a Pyrex measuring cup.
  8. Mix a little dressing at a time into the potatoes. Keep adding more dressing until the potatoes are well coated with the mixture.
  9. Cover and refrigerate at least 1/2 hour. Mix and serve.
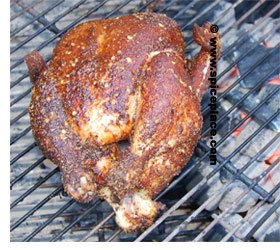
Hungry? Here’s a Delicious Maryland Grilled Whole Chicken Recipe

Picture of Maryland Grilled Chicken on a weber grillOften when we season foods for the grill we consider using spice blends like McCormicks Grill Mates and Durkee Grill Creations. While those are excellent seasonings, we like variety in our cooking and often wander off the beaten path and venture into our own seasoning wilderness. So yesterday, we came up with this recipe for Maryland Grilled Whole Chicken.
If you’re familiar with Maryland, you’ll know that it’s one of the largest producers of chicken in the world, and is home of the famous Perdue brand of chicken. Just as the Carolinas are known for their barbecued pork, Maryland is known for grilled chicken. During the summer weekends, the local benevolent societies like the Elks, Moose, VFW, and churches set up outdoor barbecues on roadsides where they serve grilled chicken. I can smell the chicken cooking now.

This chicken is seasoned with a dry rub and then basted frequently with a seasoned mop sauce. It’s cooked indirectly, and turned around everytime it’s basted so it’s cooked evenly. While we made a whole chicken, this recipe can easily be adjusted for chicken pieces by simply adjusting the cooking time.

Mop Sauce Ingredients

Dry Rub Ingredients

To make Maryland Grilled Whole Chicken

  1. Place 25 to 30 Kingsford charcoal briquets on one side of a coverable grill. Apply lighter fluid, and light the charcoal.
  2. Mix up the mop sauce in a 2 pint Pyrex measuring cup, or other glass container.
  3. Place the dry rub ingredients in a 1 gallon zipper storage bag.
  4. Wash and pat dry the chicken, place the chicken into the storage bag, and shake to evenly coat the chicken with the dry rub.
  5. When the grill is lighted, place the chicken about 6 inches away (horizontally) from the hot coals [don’t place the chicken over the coals] so that the chicken cooks slowly. Baste with an initial coat of th mop sauce. Cover the grill and close the vents to about 1/2 way.
  6. Baste with the mop sauce every 15 minutes. Rotate the chicken at each basting of mop sauce to cook the chicken evenly.
  7. Cook for about 1 1/2 hours. Check for doneness with a meat thermometer. The temperature should read 175° F when done.
  8. Remove from grill, and let rest about 10 minutes before slicing.

Serve with your favorite barbecue sauce.

If cooking chicken pieces, cook them indirectly as well, and turn and baste at 15 minute intervals.

North Carolina Pulled Pork Sandwich

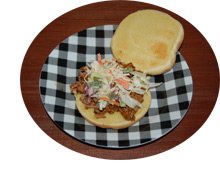
Carolina Pull Pork SandwichToday we felt like slow cooking on the barbecue, and decided to make a genuine Carolina Pork Loin. We chose a 3 pound pork loin for our roast — instead of the typical pork butt [pork shoulder] roast most typical of this recipe. Our choice of a pork loin over pork butt was mostly because of the lower fat in the pork loin. The pork butt will shred better, but as you can see below the pork loin made a great pulled pork sandwich. Chose the roast the suits your taste and diet. We lean toward the leaner cuts of meat.
Now you can’t rush a Carolina Pork Roast. It is a very slow cooked recipe, cooked either in a smoker or a covered grill over indirect heat. It’s a 4 – 6 hour long adventure that ends in a sensuous delight. We cooked our Carolina Pork Roast on our Weber kettle grill with indirect heat using Kingsford charcoal briquets. We chose the Kingsfords briquets over lump charcoal because of the long burning time we needed.

Our Carolina Pork Roast recipe uses two different steps in seasoning. First, we coat the roast with a dry rub made up of simply pepper, paprika, and sugar. Then we baste the roast every 20 minutes or so with a mix of red pepper flakes, sugar, and vinegar.

Recipe for North Carolina Pulled Pork Sandwiches

Dry rub

Mix together in a large zipper storage bag. Set aside.

Basting Sauce

Combine in a 2 cup Pyrex measuring cup, or some other glass container. Mix until sugar is dissolved. Don’t be afraid of the amount of red pepper, the vinegar will neutralize most of the heat. The pepper itself will form thicker and thicker layers on the roast as you baste and will keep the pork roast moist as it cooks slowly.

To make Carolina Pulled Pork Sandwiches

  • Dry Rub (above)
  • Basting Sauce (above)
  • 3 pound pork loin roast
  • Your favorite barbecue sauce
  • Kaiser rolls
  • Coleslaw
  1. Place about 20-25 Kingsford charcoal briquets in a pile on one side of your grill. Using charcoal lighter fluid, light the coals.
  2. While the charcoal is getting started, mix the dry rub and the Basting Sauce together.
  3. Place the pork roast in the zipper storage bag, seal, and shake to evenly coat the roast with the Dry Rub.
  4. When the coals are going, place the pork roast about 6 – 8 inches from the coals (if using a Weber grill, the coals should be on one side, and the roast close to the center). Apply a first basting of the Basting Sauce on the roast. Cover, close the vents to about half way. We want this to cook a long time (4 to 6 hours) over slow heat (about 200° F.)
  5. Baste the roast every 20 minutes with the basting sauce.
  6. You’ll need to add at least one more load of charcoal to be able to cook the length of time required. When the coals are half way burnt, and another 20 – 25 briquets. Repeat one more time if needed. The coals should be slowly burning so if they’re going fast, close the vents some more. We cooked our roast for 4 1/2 hours and only needed one refill of the briquets.
  7. As you baste the roast, you’ll notice the red pepper is building up on the roast. This coating will absorb the basting sauce and keep the roast moist.
  8. We like to keep a can of water on the grill over the coals to add moisture to the covered grill.
  9. Turn the roast around [and not over] every hour or so, so as not to overcook any one side of the roast.
  10. Check for doneness with a meat thermometer. The temperature should be 175° F when done.
  11. Remove the roast from the grill, and place on a large cutting board. Scrape off the red pepper.
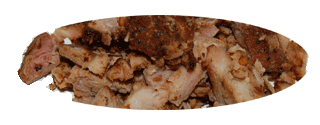
  12. Chopped Carolina porkChop the pork roast into 1/2″ to 3/4″ size chunks using a heavy meat cleaver. A cleaver is the best method of doing this task.
  13. Toast the Kaiser Rolls.
  14. Mix the chopped pork with some barbecue sauce such as Kraft, Open Pit or KC Masterpiece. Don’t overload the sauce, mix so that you’re adding about 1 1/2 tsp per 1/3 cup serving of meat.
  15. Place the pork on a toasted Kaiser roll, and top with coleslaw (we’ll post a recipe for excellent coleslaw soon).
  16. Serve with coleslaw on the side.

What type of charcoal do you use?

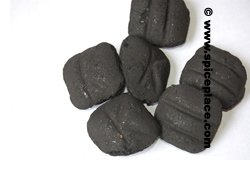
Kingsford briquetsWhen asked what charcoal is, many folks would describe Kingsford charcoal or the knock offs of Kingsford. Kingsford is a fine quality charcoal, and is made with hardwoods, ground, then bound together and pressed into briquets. Kingsford’s origin comes from the Ford Motor Company, and the product was created to find a use for all of the scrap lumber from the production of Ford Automobiles. We use Kingsford all of the time, and don’t bother with the knock-offs as we find the knock-offs are inferior to Kingsford.

But Kingsford isn’t the only charcoal on the market that’s worth cooking on. There is also a variety of charcoal known as lump charcoal. The brand we have a picture of here is Cowboy Brand, but there are other brands as well. 10 years ago or so, you had to go to a roofing supplier like The Roof Center to get lump charcoal. This type of charcoal is used by the folks that solder copper gutters together because of it’s quick lighting and hot temperature. Lump charcoal is light in weight — almost feather like compared with charcoal briquets.
Lump Charcoal

The choice of whether to use Kingsford charcoal briquets or lump charcoal depends on what you’re cooking, how long the cooking time is, and whether your grill has a way to easily add more charcoal. Since the lump charcoal lights fast, cooks hotter, and burns faster, it’s the choice charcoal for cooking fairly fast cooking foods like hamburgers, steaks, and hot dogs. It’s easy to light including in windy locations such as on the beach. But since lump charcoal burns faster then the Kingsford briquets, you’ll need to add more fuel to your grill if you’re trying to cook something longer cooking such as a roast or ribs. So we choose lump charcoal for the burgers, hot dogs, and steaks; Kingsford briquets are our choice for the beef roasts, chicken, and pork butts.

So as you’re planning your barbeque cooking, there’s more to consider then simply what to cook, there’s a choice of the type of charcoal to use as well. In the US, you can find lump charcoal in season at Trader Joe’s stores, and at roofing supply wholesalers like The Roof Center.

Recipe: Grilled Jamaican Jerk Chicken Thighs & Breasts

Prepared Jamaican Jerk Chicken RecipeWe’ve been trying to perfect Jamaican Jerk Chicken and have come to realize that the secret is in preparation and planning. We bought a bunch of chicken breasts and chicken thighs, and decided to try making the Jamaican Jerk Chicken two ways. The first way was straight following the recipe on the package of McCormick Carribean Jerk Seasoning which called for marinating the chicken for 2 hours. The second way was to mix up another batch of the jerk marinade, and allow the chicken time to soak up the flavors by marinating overnight.

What we discovered from these two trials is that the longer marinating resulted in a much more flavorful meal. We were a little afraid that the longer seasoning time would result in an overpowering taste of the Jamaican Jerk Seasoning, but that didn’t happen at all. The 2 hour seasoned chicken still had a nice jerk flavor and is acceptable in a pinch. If you have the time, we recommend marinating the chicken overnight, or for 24 hours.

Recipe for Jamaican Jerk Chicken

  1. In a 2 cup pyrex cup, combine the jerk seasoning mix, with 1 cup canola or olive oil, and 1/3 cup lemon juice. Mix well.
  2. Wash the chicken, and place in a large heavy duty reclosable plastic bag.
  3. Pour the jerk marinade into the bag, seal tightly, and turn to evenly distribute the seasoning.
  4. Place the chicken in the refrigerator, and turn every so often to allow the marinade to cover other pieces of chicken.
  5. Marinate 2 – 24 hours. The longer the more flavor with infuse to the chicken.
  6. To grill, cook the chicken close to but not over hot coals until cooked through.
  7. To bake, place the chicken in a single layer in a 2″ deep baking pan, and bake at 325° F for 1 hour 20 minutes.

Note, we find that chicken thighs are best with the recipe. Since not all folks like dark meat, we added some chicken breasts. But the thighs are exceptional juicy and flavorful.